A guided tour
This tour will go through most essential Vectarine features and show how to use them. It is not an exhaustive list of all APIs. Read the dedicated articles on UI, widgets, performance, etc. for more in-depth information about specific features.
The goal of this guide is to give you the building blocks to make your first 2D game with Vectarine and to serve as a quick reference with simple examples.
🌱 Introduction
Section titled “🌱 Introduction”Vectarine is a game engine to make games super quickly with the best possible experience for game makers.
Vectarine uses the Lua programing language. To be more precise, it uses Luau, a variant of Lua with better performance and autocompletion than regular Lua but the same syntax.
This manual is an unopiniated guide to making games using Vectarine. If you already have a bit of game making experience and want to integrate Vectarine into your workflow, this guide is for you. If you are new to making games, you can still read this guide, but consider reading Create your first game first. We assume you have some experience with programming and game making. You know the concept of function, variable, loops, etc.
🆕 Getting started
Section titled “🆕 Getting started”I recommend using Visual Studio Code as a text editor with the Luau extension but you are free to use any text editor you want, for example Zed or Neovim.
Start the editor by running the VectarineEditor executable. A window should open.
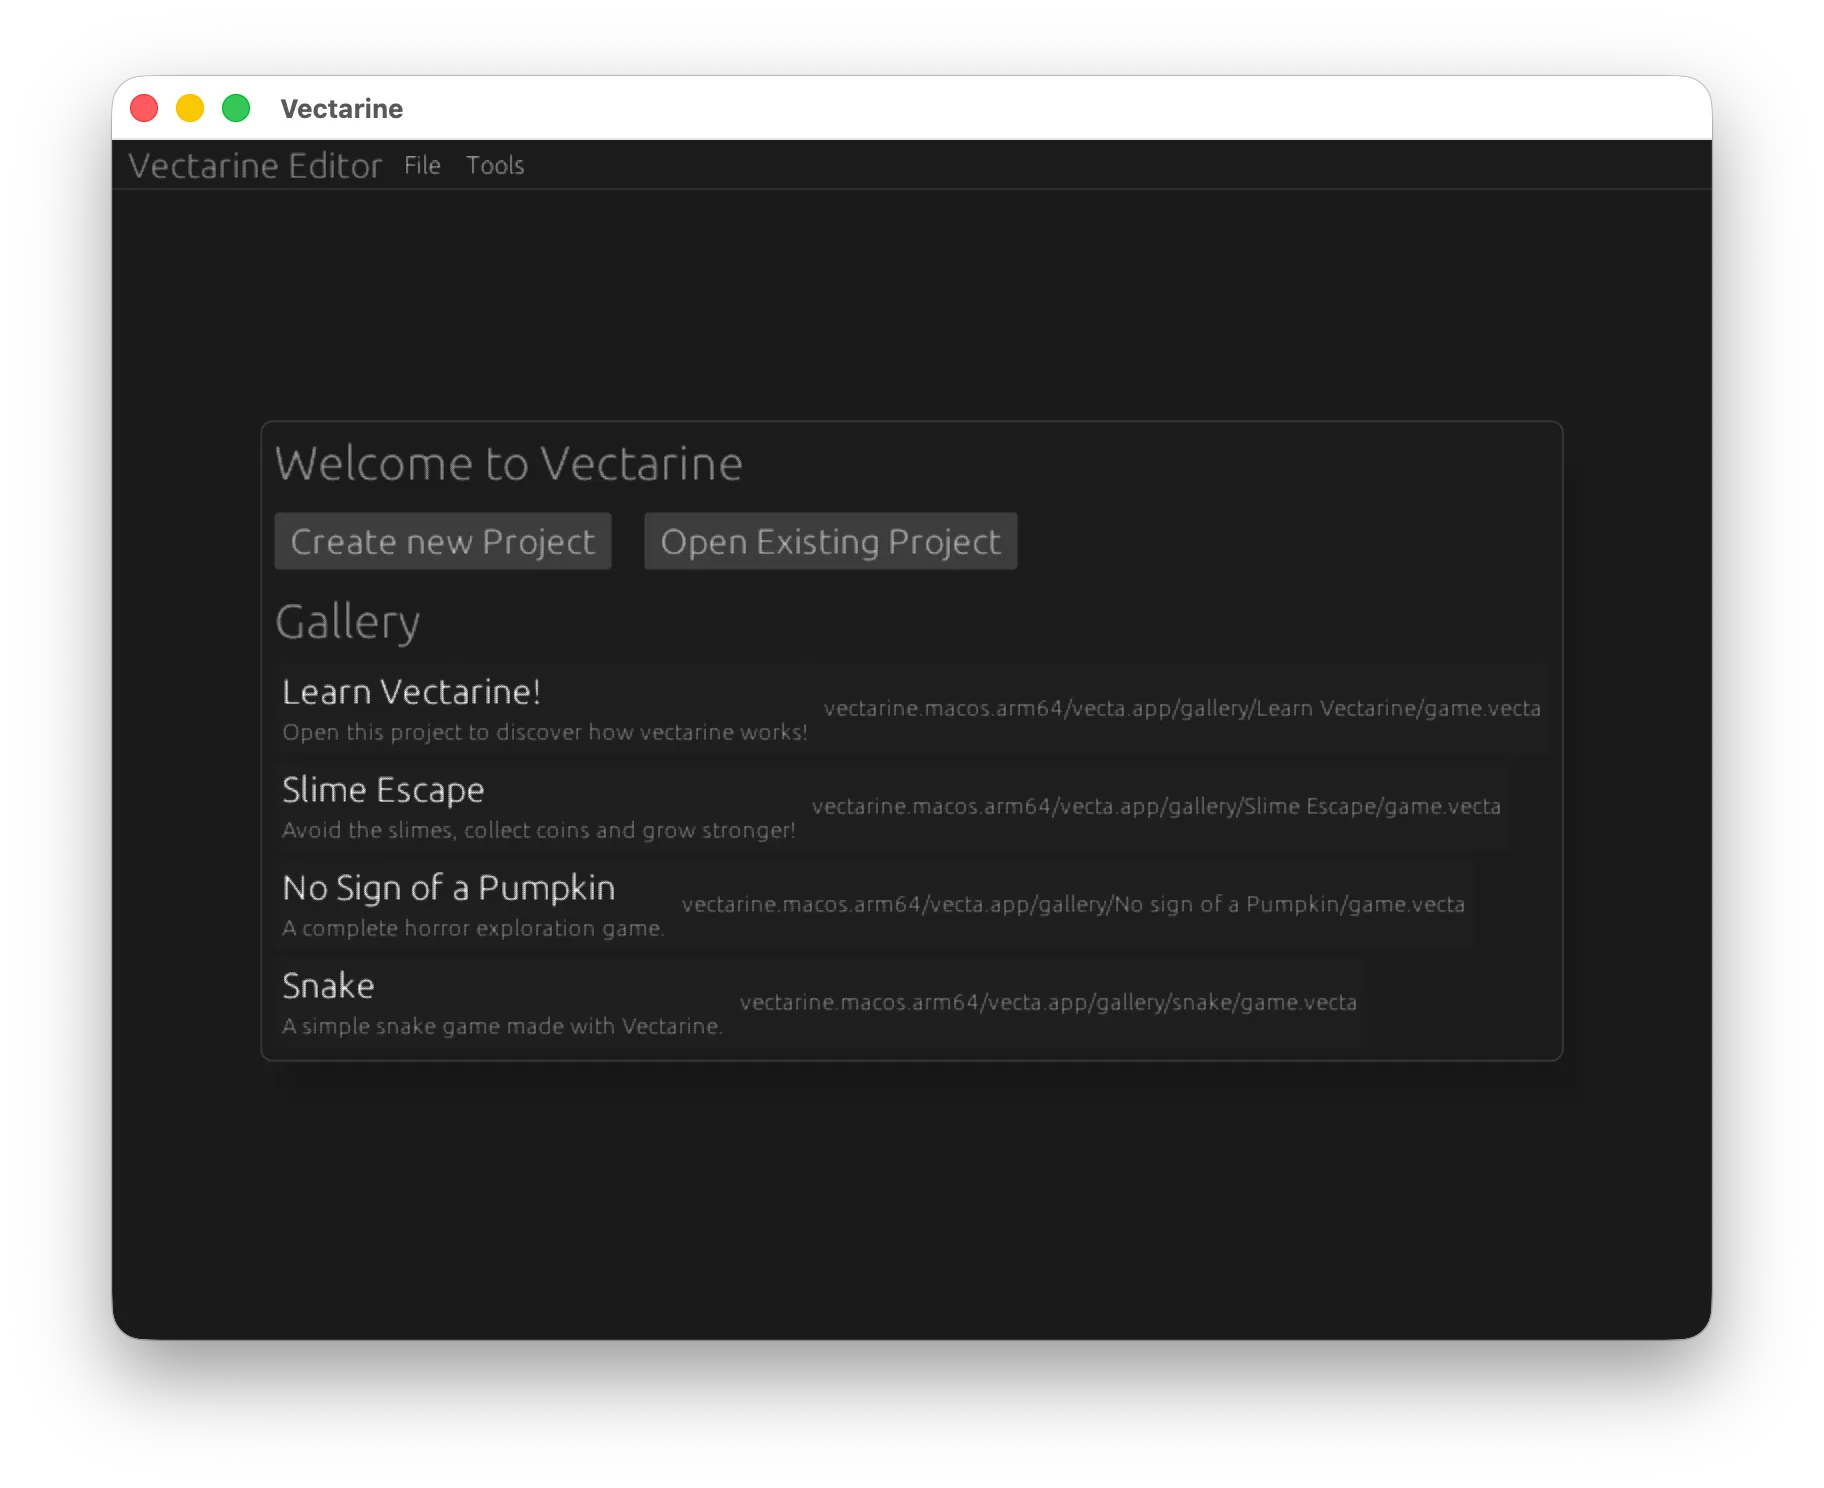
You can press Create a new project to select the location where you want to create your project.
Once you created your project, you will see a white screen. This is normal, as no code has been written yet. You can open the resources tab from the tools menu or with Ctrl+2 to see the files of your project.
Your game has only one resource, the main script, scripts/game.luau.
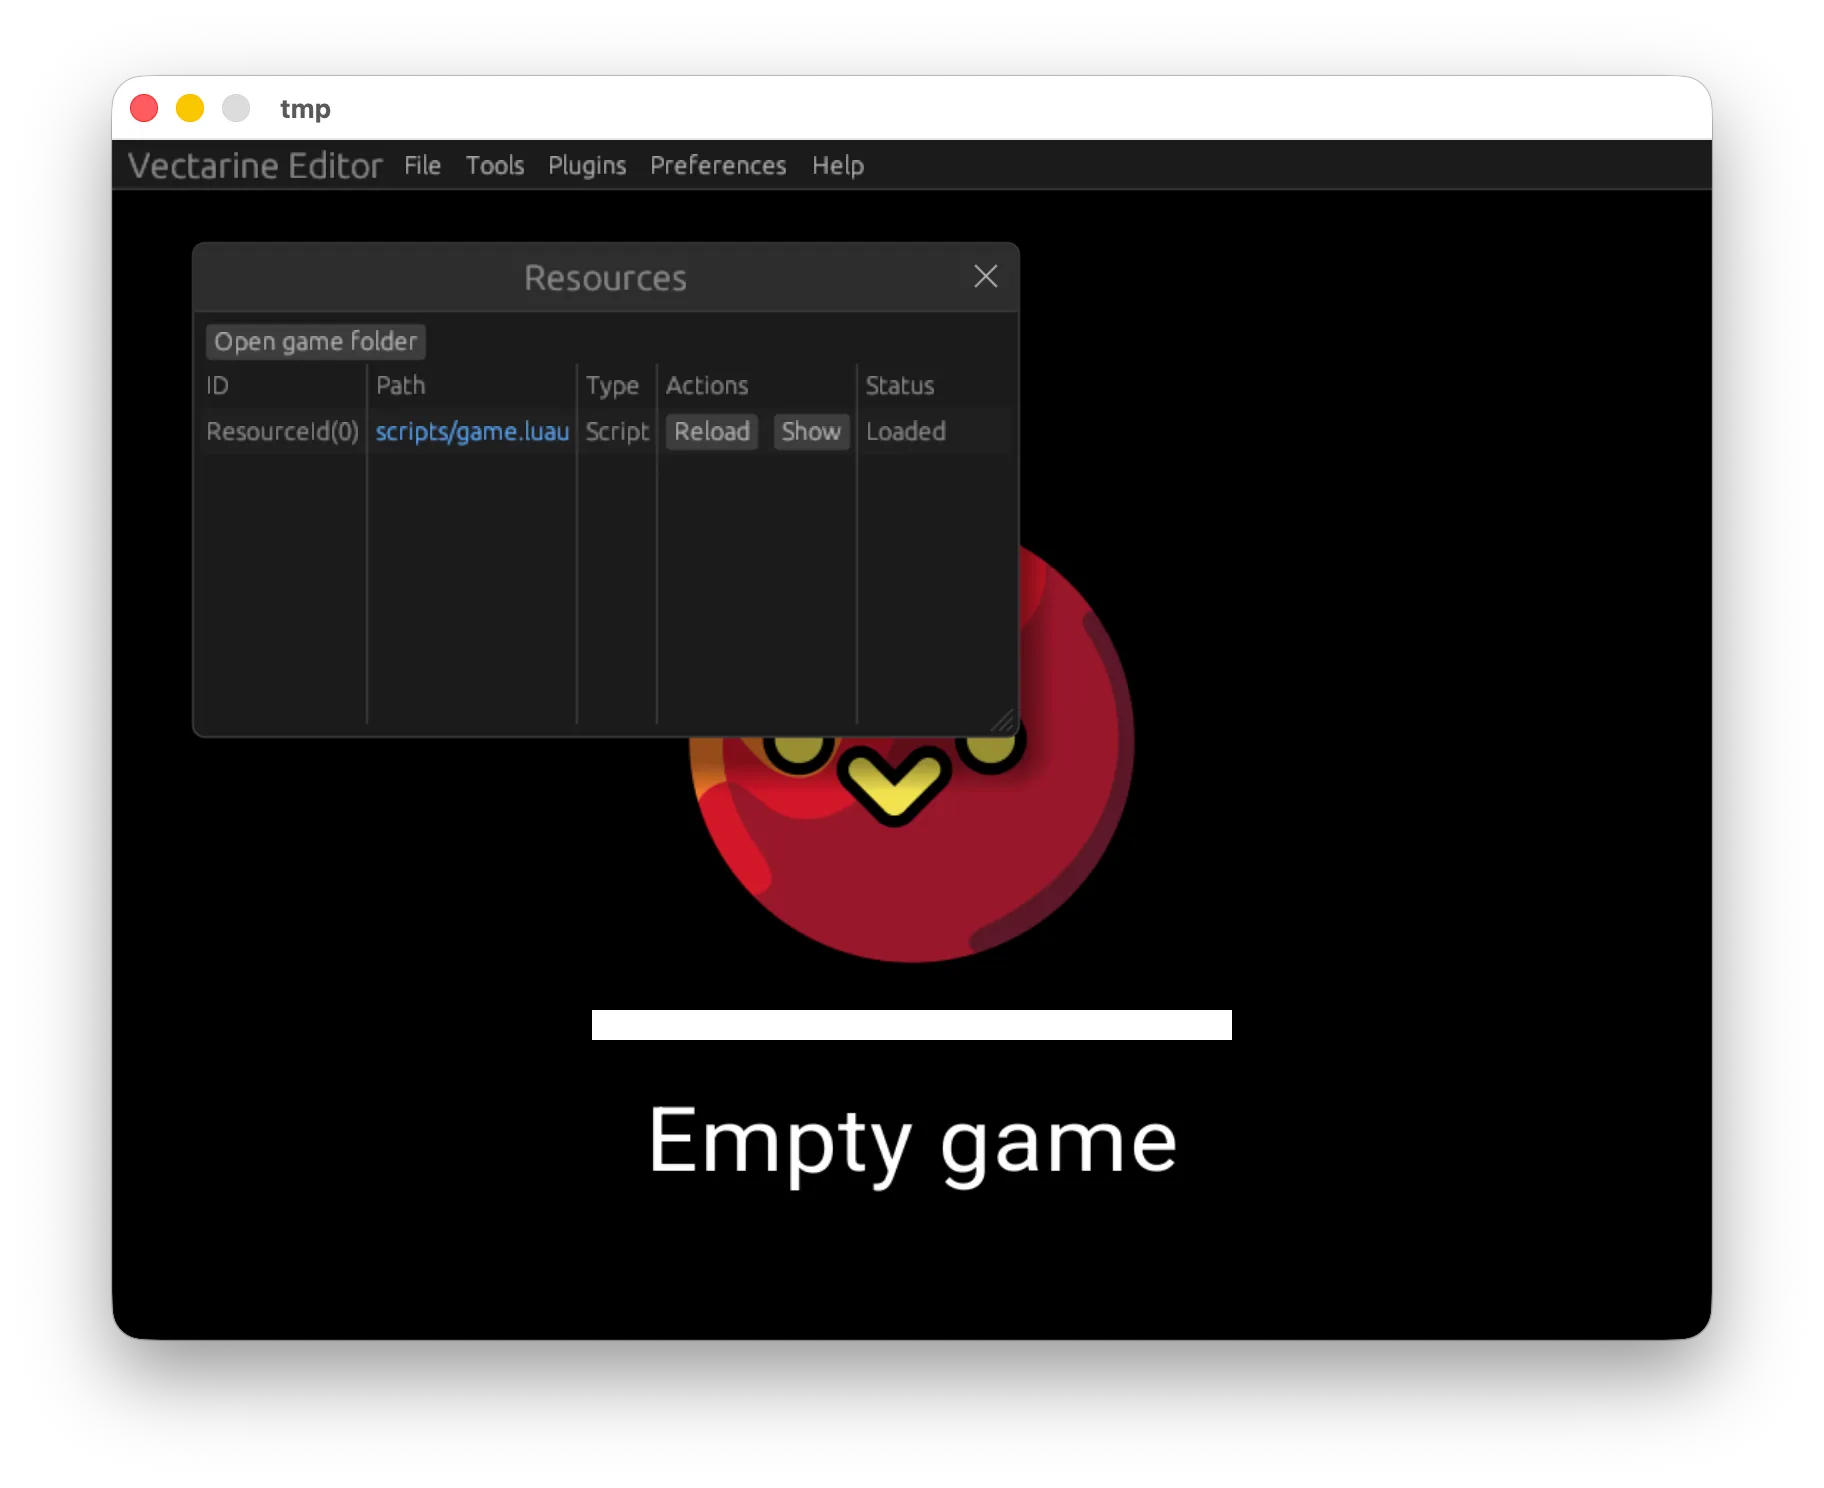
You can click the blue text scripts/game.luau to open it in your default text editor. You can also open it manually from your file explorer.
Try to change the content of this file to:
local Debug = require('@vectarine/debug')
local Graphics = require('@vectarine/graphics')
local Vec4 = require('@vectarine/vec4')
Debug.print("Loaded.")
function Update(deltaTime: number)
    -- Change the background color to red
    Graphics.clear(Vec4.RED)
    Debug.fprint("Rendered in ", deltaTime, "sec")
end
As you save, the game updates instantly.
See the luau-api folder for a list of available functions lua. This folder is automatically generated by vectarine and its content should not be modified manually.
With a Luau extension / plugin installed, your text editor be able to autocomplete your code using the functions in luau-api. luau-api is a great source of documentation and can be though of as a companion to this manual.
🌙 Using Vectarine and Luau
Section titled “🌙 Using Vectarine and Luau”When your game is first loaded, its code, located inside scripts/game.luau, is executed.
Then, every frame, the function Update you defined is called with time_delta which is the duration since the start of the last frame in seconds.
Vectarine tries to run at 60 fps, so time_delta is at least 0.0166667 seconds and increases as your rendering gets more complicated.
You can print things to the console using the debug module. You can open the console by pressing Ctrl+1.
local Debug = require('@vectarine/debug')

Debug.print("Game loaded")

function Update(timeDelta: number)
    -- Use Debug.fprint when printing every frame to avoid flooding the console
    Debug.fprint("Frame update, time since last frame: ", timeDelta, " seconds")
end
When you type and save, the game reloads automatically and you should see Game loaded printed again in the console.
🎨 Drawing on the screen
Section titled “🎨 Drawing on the screen”Drawing functions are inside the graphics module.
When drawing things on the screen, you need to tell Vectarine where to put them. To do so, you have two options, you can either use Vec or Coord.
Using Vec
Section titled “Using Vec”Most functions can take a Vec2 from the vec module to define positions and sizes. You can use the Vec.V2 function to create a Vec2.
The first argument to V2 (called x) is the horizontal position, the second argument (called y) is the vertical position.
(0,0)is the center of the screen.(-1,-1)is the bottom left of the screen.(-1,1)is the top left of the screen.(1,-1)is the bottom right of the screen.(1,1)is the top right of the screen.
The screen is always 2 units wide and 2 units tall, regardless of the window size or aspect ratio.
--- Import the Vec module to create 2D vectors
local Vec = require('@vectarine/vec')
-- Colors are represented as 4D vectors (red, green, blue, alpha). You need the Vec4 module to create them.
local Vec4 = require('@vectarine/vec4')
local V2 = Vec.V2 -- alias the V2 function as it is used very often
local Graphics = require('@vectarine/graphics')

function Update(time_delta: number)
    -- Draw a white background.
    local bgColor: Vec4.Vec4 = Vec4.WHITE
    Graphics.clear(bgColor)

    -- Draw a blue rectangle at the bottom right of the screen
    local rectColor = Vec4.createColor(0, 0, 1, 1)
    Graphics.drawRect(V2(0.7, -1), V2(0.3, 0.3), rectColor)

    -- Draw a red circle at the center of the screen with radius 0.1 (2 is the width of the screen)
    -- Vec.ZERO2 is a constant for Vec.V2(0,0)
    local circleColor = Vec4.V4(1, 0, 0, 1)
    Graphics.drawCircle(Vec.ZERO2, 0.1, circleColor)
end
Using Coord
Section titled “Using Coord”📖 TLDR; Coordinates are like vectors with a unit.
Drawing with Vec is convenient, however, often, you want to draw squares, or shapes where the width to height ratio needs to stay constant when the window is resized.
When using Vec, this means manually multiplying your position by screen_height/screen_width to normalize everything.
As this is something that all games need, Vectarine provides a shortcut: Coordinates!
Coordinates come from the @vectarine/coord module and allow you to refer to position and distance on the screen in the way you like.
You can use Coord.px, Coord.gl, Coord.vw and Coord.vh to create a ScreenPosition which refers to a position on the screen.
Using Coord.gl is the same as using Vec, but you are more explicit.
In the px coordinate system, (0,0) is the top-left of the screen, and (window_width, window_height), as returned by Io.getWindowSize() is the bottom-right of the screen.
This is the coordinate system used by most drawing APIs, for example HTML canvas or SDL.
There is also the vw system where 100 represents the full width of the screen and vh where 100 represents the full height of the screen, which are inspired by CSS units.
You can use px, gl, vw and vh to define position on the screen using the coordinate system you prefer.
Once you have a ScreenPosition, you can convert it back to a Vec using the :px(), :gl(), :vw() and :vh() methods.
⚠️ You cannot add 2 positions together as this does not make sense. Consider
Coord.px(0,0) + Coord.gl(0,0). One refers to the center of the screen and the other to the top-left of the screen. Adding them together does not make sense.
To refer to vectors on the screen you need to use pxVec, glVec, vwVec and vhVec.
These functions return a ScreenVec which represents a vector on the screen. You can also get a ScreenVec by substracting 2 ScreenPositions.
You can add or remove a screen vector to a screen position to get another position, even if they are in different coordinate systems.
In general, you can perform the usual operations you’d expect with them:
local Coord = require('@vectarine/coord')
local Vec = require('@vectarine/vec')
local Debug = require('@vectarine/debug')
local Graphics = require('@vectarine/graphics')
local Vec4 = require('@vectarine/vec4')

local V2 = Vec.V2

function Update(time_delta)
    Graphics.clear(Vec4.WHITE)
    local rectColor = Vec4.RED

    -- There are multiple ways to create a 'ScreenPosition' using the coordinate system you prefer
    local pos = Coord.gl(V2(0, 0)) -- refer to the center of the screen
    local other_pos = Coord.px(V2(200, 200)) -- refers to position (200,200), in pixels, from the top-left
    Debug.print(pos:px()) -- print the corresponding pixel position as a regular vector

    -- Draw a square at the center of the screen, with side length 200px
    -- Coord.CENTER is a constant for Coord.gl(Vec.V2(0,0))
    local squareSize = Coord.pxVec(V2(200, 200))
    Graphics.drawRect(Coord.CENTER - squareSize:scale(0.5), squareSize, rectColor)

    local pos2 = Coord.px(V2(100, 100)) -- refer to a position in pixels
    local size2 = Coord.glVec(V2(1, 1)) -- a quarter of the screen
    Graphics.drawRect(pos2, size2, rectColor)
end
⚠️
Coord.pxVec(Vec.V2(1,1))points towards the bottom-right whereasCoord.glVec(Vec.V2(1,1))points towards the top-right!
Graphics contains a lot of other functions to draw images, arrows, or polygons. See luau-api/graphics.luau for the full list.
All functions can use Vec or ScreenPosition / ScreenVec when relevant to draw things. Use the style you prefer!
⌨️ Interacting with the user
Section titled “⌨️ Interacting with the user”The functions to get user input are inside the Io module.
There are many functions inside Io, which won’t all get
listed as they have explicit names, but we’ll show the main
ones and how to use them.
Getting the position of the mouse
Section titled “Getting the position of the mouse”local Io = require("@vectarine/io")
local Vec = require("@vectarine/vec")
local Debug = require("@vectarine/debug")
local Vec4 = require("@vectarine/vec4")
function Update()
local m: Vec.Vec2 = Io.getMouse()
Debug.fprint(m) -- Print the position of the mouse on every frame
-- Draw a green circle at the position of the cursor.
Graphics.drawCircle(m, 0.1, Vec4.GREEN)
end
Checking if a button is pressed
Section titled “Checking if a button is pressed”local Io = require("@vectarine/io")
local Vec = require("@vectarine/vec")
local Debug = require("@vectarine/debug")
local Vec4 = require("@vectarine/vec4")
function Update()
local isSpacePressed = Io.isKeyDown("space")
-- Draw a rectangle when space is pressed
if isSpacePressed then
Graphics.drawRect(Vec.V2(0, 0), Vec.V2(0.1, 0.2), Vec4.RED)
end
-- If you need to perform something only once when a key is pressed, you can use `isKeyJustPressed`
if Io.isKeyJustPressed("r") then
Debug.print("R was just pressed!")
end
-- Print pressed keys
Debug.fprint(Io.getKeysDown())
-- Print which mouse buttons are pressed
Debug.fprint(Io.getMouseState())
end
Events
Section titled “Events”Sometimes, instead of checking every frame is a button is pressed, you want to perform something only once it is pressed. To do this, you can use events.
local Event = require("@vectarine/event")
local Debug = require("@vectarine/debug")

-- Notice that we subscribe to the event only once, not on every frame!
local counter = 0
Event.getKeyDownEvent():on(function(key: string)
    -- This is called once per press.
	Debug.print("Key down: ", key)
    counter = counter + 1
end)

function Update()
    Debug.fprint("Count: ", counter)
end
The Event module has multiple useful events you can subscribe to.
You can also create your own events using Event.newEvent("name") if you need to.
📖 Sometimes, you commonly want to perform an action when debugging This can be spawning a specific enemy, teleporting to a location or resetting the state to some value. You can use the
Event.getConsoleCommandEvent()event to listen to what you are typing inside the console and trigger specific helpful behavior.
🗺️ Global and Local variables
Section titled “🗺️ Global and Local variables”In Luau, variables and functions are global by default. You can make them local by adding the local keyword before defining them.
local Debug = require("@vectarine/debug")

local someLocalNumber = 10
myGlobalVar = 3

-- To be explicit when defining globals, we usually use the syntax _G.variableName = value
-- _G is the global object
someLocalNumber = 11 -- Changing the value of an existing variable
_G.otherGlobalValue = "abc" -- Setting a global value

function thisIsGlobal()
    Debug.print("a global function is called!")
end

local function thisIsLocal()
    Debug.print("a local function is called!")
end
When possible, prefer using local variables and local functions. This prevents you from overwriting a variable by mistake by creating 2 variables with the same name in two different functions.
However, global variables have some advantages.
First, you can inspect and edit the value of a global variable in the Watcher tool (Open using Ctrl+3)
Second, the value of global variables is preserved between script reloads. This is useful when developing as there is usually part of your state that you want to reset when reloading and part that you want to keep.
My recommendation is to always use local, but set them using persist API:
local Persist = require("@vectarine/persist")

-- playerPos is both a local and a global.
-- Because it is local that you get proper typing and information if it is unused
-- Because it is global, its value is preserved between reloads and you can edit it inside the watcher tool
-- The Vec.V2(0,0) is only used for the first initialization.
local playerPos = Persist.onReload(Vec.V2(0, 0), "playerPos")

-- 👷 Persist.onRestart is not available yet
-- When you quit and restart the game, the player health is persisted.
-- Note that functions cannot be persisted, only strings, numbers, booleans, nil and tables made of these types.
local playerInfo = Persist.onRestart({ health = 100 }, "playerInfo")
Internally, Persist.onReload looks like this:
local function onReload(initialValue, name)
    if _G[name] == nil then
        _G[name] = initialValue
    end
    return _G[name]
end
🖼️ Loading images, scripts, and other resources
Section titled “🖼️ Loading images, scripts, and other resources”You can load images, scripts, and other resources using the Loader module.
Let’s see how to works with Images.
Images
Section titled “Images”local Loader = require("@vectarine/loader")
local Vec = require("@vectarine/vec")
local Coord = require("@vectarine/coord")
local myImage = Loader.loadImage("textures/my_image.png")
function Update()
if myImage:isReady() then
-- Draw the image at the center of the screen with size 200x200 pixels
local size = Coord.pxDelta(Vec.V2(200, 200))
myImage:draw(Coord.gl(Vec.ZERO2) - size:scale(0.5), size)
end
end
⚠️ The path to a resource is case-sensitive. “textures/my_image.png” is different from “textures/My_Image.png”!
When you call loadImage, the image is not immediately available on all platforms. On the web, the browser needs to download it first.
To represent this, loadImage returns a resource handle which you can use to check if the resource is ready using isReady.
All functions inside Loader behave this way. You can load scripts, shaders, fonts, and other resources using the same pattern.
To draw text, you can either load your own font or use the default font.
local Loader = require("@vectarine/loader")
local Text = require("@vectarine/text")
local Vec = require("@vectarine/vec")

local fontResource = Loader.loadFont("fonts/my_font.ttf")

function Update()
    if not fontResource:isReady() then
        return
    end
    -- Using your own font:
    fontResource:drawText("Hello", Vec.V2(0, 0), 0.16)

    -- Or using the default font (Roboto)
    Text.font:drawText("world", Vec.V2(0, -0.16), 0.16)
end
Sound and Music
Section titled “Sound and Music”Loading sounds works just like images, but you call the loadAudio function instead of loadImage.
Others
Section titled “Others”There are many other types of resources, but they all work the same way, you call a loadX function and get a resource handle that you can check for readiness using isReady.
Once this resource is ready, you can call resource specific function on it, for example, draw for images or play for audio.
✂️ Splitting and organizing your code
Section titled “✂️ Splitting and organizing your code”❓ Why split code into multiple files?
You can write your game inside one giant main.luau file, but after a few hundred lines, scrolling takes time and
you spend more and more time searching for relevant lines. That is a sign that you should split your code into
multiple files.
Scripts as Resources
Section titled “Scripts as Resources”To run another .luau file, it needs to be loaded as a resource. You can load it using the loadScript.
Loading resources is not instant. The system needs to wait the resources to become ready. Meanwhile, you can
show a loading screen or something else.
Example:
local Loader = require('@vectarine/loader')
local Event = require('@vectarine/event')

local otherScriptResource = Loader.loadScript("scripts/other_script.luau")
local resourceReadyEvent = Event.getResourceLoadedEvent()

resourceReadyEvent:on(function(resource_handle)
    if otherScriptResource == resource_handle then
        -- The resource is ready, you can access global variables and functions defined inside other_script
    end
end)

-- You can also check at any point if a resource is ready or not:
if otherScriptResource:isReady() then
    -- OK
end
Using modules
Section titled “Using modules”Once a script is loaded, all future calls to loadScript with the same path will return a handle to the same resource and are instant.
By default all global variables and functions are shared between files. This has pros and cons:
- If you have one big file, you can just copy and paste chunks into other files and everything will still work
- If two global functions have the same name, they will override each-other and the last one defined will win.
- You don’t get typing across file boundaries, so you will get ‘unknown global’ errors from Luau despite everything working fine.
- Global variables have the ‘any’ type, so if you change their type somewhere, you won’t get errors about incorrect use elsewhere.
Because of that, we recommend doing the following (this is just a recommendation, you do you!):
- Keep functions local whenever possible using the
local function(...) function_content() endsyntax. - Put the functions and variables exported by a module in a table that gets returned.
- When calling
loadScript, pass the require call as the second argument to gather the exports of the script with proper types. - Never use globals.
There is a simple example with 2 files: helper.luau and main.luau.
-- helper.luau
local module = {} -- This is where all our exports will go
local my_value = 3

-- add_things is inside module, it gets exported
function module.add_things(a: number, b: number): number
    -- Notice that despite my_value not being exported, it can be used inside exported functions!
    return a + b + my_value
end

return module -- return for the module to make it available
-- main.luau
local Debug = require('@vectarine/debug')
local Loader = require('@vectarine/loader')

--- We use the import 'technique'
local helperResource, Helper = Loader.loadScript("scripts/helper.luau", require("helper.luau"))

--- Loader.loadScript is what actually executes `helper.luau`.
--- require() returns an empty table, but is properly typed.
--- When a table is passed as the second argument to loadScript, it is filled with the exports of the script.
--- This gives the impression that require() returns the exports of the script, but it does not.

--- Note that the Helper variable is still empty until the resource is ready.

--- Also, note that `helper.luau` is only executed once. If you rerun loadScript, you'll get a handle to the same resource.
--- However, Helper will always be filled with the latest exports of the script, even if it is reloaded.
--- This only works if the script returns a table, otherwise, this is ignored.

function Update()
    if !helperResource.isReady() then
        -- Don't forget to add a loading state to indicate that the script is not ready yet!
        Debug.fprint("Loading helper.luau...")
        return
    end
    -- The script is loaded and ready for use!
    Debug.fprint("adding things: ", Helper.add_things(3+1))
end
Organizing rendering using Widgets
Section titled “Organizing rendering using Widgets”You can use Widgets to organize your rendering code. A widget can be a menu, an inventory or the main game screen.
Widgets also help keep reloading snappy as Vectarine only needs to reload the code for the current screen.
local Ui = require("@vectarine/ui")
local Io = require("@vectarine/io")
local Vec = require("@vectarine/vec")

local size_of_the_widget = Vec.V2(2, 2)
local widget: Ui.Widget<any> = Ui.widget(size_of_the_widget, function()
    -- Code for drawing the widget.
end)

local another_widget: Ui.Widget<any> = Ui.widget(size_of_the_widget, function()
    -- Code for drawing the other widget.
end)

-- List all the widgets you want to draw here
local tabs: Ui.TabWidget<any> = Ui.tabs({ "default_tab_name" = widget, "another_tab_name" = another_widget })
tabs:setActiveTab("default_tab_name")

function Update(time_delta: number)

    if Io.isKeyJustPressed("Space") then
        -- Depending on the player action, you can switch to another widget
        tabs:setActiveTab("another_tab_name", {
            -- You can add transition between screens if you want, or transition directly
            -- You can also use a custom function as the animationType
            duration = 1.0,
			animationType = "slide_up",
        })
    end

    -- Don't forget to draw tabs widget!
    tabs:draw()
end
You can have one main widget per file to split logic and rendering code. There is more information about using widgets to make complex interfaces in the dedicated page.
🌁 Using Shaders
Section titled “🌁 Using Shaders”(Fragment) Shaders are little programs that are executed by the GPU and which run on every pixel of an input image. They are useful to apply custom graphics effects like blurs, outlines, sepia filters, recoloring images, etc…
In Vectarine, shaders are attached to a canvas, a custom drawing surface.
As an example, Let’s use this shader which applies a wave deformation effect to its input
precision mediump float; // you need to specify this for your shader to run in a browser
in vec2 uv; // input position
uniform sampler2D tex; // input image (the content of the canvas)
uniform float iTime; // you have access to a time variable in all shaders to apply dynamic effects
out vec4 frag_color; // output color

void mainImage(out vec4 fragColor, in vec2 fragCoord) {
    fragColor = texture(tex, vec2(uv.x + cos((uv.y*4.0+iTime)*10.0)/100.0, uv.y + sin((uv.x*4.0+iTime)*10.0)/100.0));
}
void main() {
    mainImage(frag_color, uv);
}
You can put it inside gamedata/shaders/wave.glsl.
Then you can use it like so:
local Canvas = require("@vectarine/canvas")
local Io = require("@vectarine/io")
local Loader = require("@vectarine/loader")
local Vec4 = require("@vectarine/vec4")
local Graphics = require("@vectarine/graphics")
local Vec = require("@vectarine/vec")
local V2 = Vec.V2

local shaderResource = Loader.loadShader("shaders/wave.glsl")

-- Create a canvas of size 1200x800 pixels and attach the shader to it.
local canvas = Canvas.createCanvas(1200, 800)
canvas:setShader(shaderResource)
-- You can call canvas:setShader(nil) to stop using a given shader and draw the content of the canvas as-is.

function Update()
    -- Now, we can draw to the canvas
    canvas:paint(function()
        -- Every call to Graphics.drawSomething inside paint will be not displayed on the game window
        -- It will be drawn to the canvas instead
        -- Note: you can draw the content of one canvas to another canvas to chain multiple shader effects.
        Graphics.drawRect(Vec.ZERO2, V2(0.1, 0.1), Vec4.RED)
    end)

    -- The canvas can be drawn like an image.
    -- When it is drawn, the shader is executed
    canvas:draw(V2(-1, -1), V2(2, 2))
end
You can find more information about shaders in the great book of shaders
⚠️ Inside the paint callback,
Coord:pxVec(V2(1, 1))refers to 1px on the canvas, not on the window! You can pass an optional argument to pxVec to specify the size of the drawing area if you want.canvas:paint(function() local v1 = Coord.pxVec(V2(1, 1)) -- 1px on the canvas local v2 = Coord.pxVec(V2(1, 1), Io.getWindowSize()) -- 1px on the window local v3 = Coord.pxVec(V2(1, 1), V2(1200, 800)) -- 1px of a 1200x800 area, same as v1 end)
⚛️ Physics
Section titled “⚛️ Physics”Vectarine provides a simple physics system to handle collisions and object interactions. Rapier is used under the hood, but you don’t need to understand Rapier to use Vectarine’s physics system.
Let’s looks at an example:
local Graphics = require("@vectarine/graphics")
local Io = require("@vectarine/io")
local Persist = require("@vectarine/persist")
local Physics = require("@vectarine/physics")
local Vec = require("@vectarine/vec")
local Vec4 = require("@vectarine/vec4")

-- A world is a collection of objects that can interact with each other
-- You can add gravity to the world by setting the gravity property.
local world = Persist.onReload(Physics.newWorld2(Vec.V2(0, -0.3)), "world")

local boxCollider = Physics.newRectangleCollider(Vec.V2(0.1, 0.1))
local circleCollider = Physics.newCircleCollider(0.1)

-- Objects are given shape using colliders.
local groundCollider = Physics.newRectangleCollider(Vec.V2(10, 0.1))

-- Objects have multiple properties: position, velocity, rotation, etc...
-- We create a 'static' object which will not move by itself.
local ground = Persist.onReload(world:createObject(Vec.V2(-5, -1), 1, groundCollider, { "ground" }, "static"), "ground")
-- You can store extra data in objects
ground.extra = { color = Vec4.createColor(0.5, 0.2, 0.4, 1) }

function Update(deltaTime: number)
	Graphics.clear(Vec4.BLACK)

	if Io.isKeyJustPressed("space") then
        -- Dynamic objects react to collisions and move
        -- Try replacing boxCollider with circleCollider, or using newPolygonCollider!
		local object = world:createObject(Vec.V2(math.random(), 0), 1, boxCollider, { "box" }, "dynamic")
		object.extra = { color = Vec4.createColor(math.random(), math.random(), math.random(), 1) }
	end

	local objects = world:getObjects()
	for _, obj in pairs(objects) do
        -- We can use getPoints() to get the collision shape of the object
		Graphics.drawPolygon(obj:getPoints(), obj.extra.color)
	end

    -- Don't forget to call step to move the simulation forward in time
	world:step(deltaTime)
end
You can manually modify the position, velocity, rotation, etc… of objects in the world using o.position, o.velocity, o.linearDamping, o.rotation, o.rotationSpeed…
Be careful, when Vectarine is minimized, to save CPU performance (and battery life!), it enters sleep mode where it runs at a maximum of 10 FPS.
This means that delta_time can get very big and break your simulation! Indeed, when the higher delta_time is, the less often Update is called and the less
accurate the physics simulation is! You need to deal with this case in your code.
You can several options.
- If you are writing an Idle game, the idle behavior is important, so you need to write some custom logic to account for it.
- For other types of games, you can just pause the update function when you detect that the window is minimized. You can do so using the
Io.isWindowMinimizedfunction.
🚀 Performance Tips
Section titled “🚀 Performance Tips”The golden rule of performance is to measure first! Don’t optimize code that is fast enough or you’ll spend your time making your game fast instead of fun. Moreover, you need tools to measure speed to know if your changes actually make a difference.
Vectarine has a built-in profiler tool to help you understand what parts of your game are taking the most time. You can open it from the Tools menu or using Ctrl+4.
The profiler
Section titled “The profiler”Checking for FPS is not super useful as Vectarine will always try to run at a number that divides the refresh rate of your monitor. For example, if your monitor runs at 60 Hz, Vectarine might run at 60 fps, 30 fps or 20 fps. If your game is able to render at 50 fps, Vectarine will round that down to 30 fps.
The profiler thus shows not only the FPS, but also the processing time per frame. Generally, the following happens to render a frame of your game:
- You perform some computation to update the state of your game
- You draw your game
- You wait a little to sync with the monitor (Vectarine does that automatically)
The profiler shows you how much time is spent on each of these steps and how this varies over time.
You can also use the Debug.timed function to measure the time taken by a section of code and have it
drawn in the profiler.
function Update()
    Debug.timed("AI", function()
        -- Your code here
    end)

    Debug.timed("Graphics", function()
        -- Your code here
    end)

    Debug.timed("Physics", function()
        -- Your code here
    end)
end
Debug.timed will run your function and measure the time taken by it. You can nest Debug.timed calls to measure sub-sections of your code.
You can also call timed inside loops to know you much time different parts of the loop take.
function Update()
    for i = 0, 1000 do
        Debug.timed("Loop Section A", function()
            -- Your code here
        end)
        Debug.timed("Loop Section B", function()
            -- Your code here
        end)
    end
end
This will only create 2 metrics, “Loop Section A” and “Loop Section B”. Because you can filter metrics by name, you should use common prefixes or suffixes to group related metrics.
Using fastlist
Section titled “Using fastlist”A Fastlist is just a list of Vec2. However, unlike regular Lua tables,
they are very fast because they can only contain Vec2 which allows for some optimizations.
Rewriting code to use a fastlists is the simplest way to greatly improve performance.
Let’s compare 2 ways to draw a grid of 100x100 rectangles:
-- Without fastlists, this takes about 5ms depending on your device
Debug.timed("Without fastlists", function()
    for x = 0, 100 do
        for y = 0, 100 do
            local v = Vec.V2(-0.9 + x * 0.011, -0.9 + y * 0.011)
            Graphics.drawRect(v, Vec.V2(0.01, 0.01), Vec4.BLUE)
        end
    end
end)

-- With fastlists, about 0.8 ms
Debug.timed("With fastlist", function()
    -- Fastlist's version of a double nested for-loop
    local positions = fastlist.newLinspace(Vec.V2(0, 0), Vec.V2(100, 100), Vec.V2(1, 1))
    -- Scale the fastlist
    positions = positions:scale(0.011) + Vec.V2(-0.9, -0.9)
    -- We create separate fastlists for sizes and colors
    local sizes = fastlist.fromValue(Vec.V2(0.01, 0.01), #positions)
    local colors1 = fastlist.fromValue(Vec.V2(0, 0), #positions) -- R,G
    local colors2 = fastlist.fromValue(Vec.V2(1, 1), #positions) -- B,A
    -- We weave the fastlists together
    local together = positions:weave({ sizes, colors1, colors2 })
    -- We draw them
    together:drawRects()
end)

-- If we use newLinspace properly, we can get down to 0.3ms!
Debug.timed("With linspace", function()
    local positions = fastlist.newLinspace(Vec.V2(-0.9, -0.9), Vec.V2(0.2, 0.2), Vec.V2(0.011, 0.011))
    local sizes = fastlist.fromValue(Vec.V2(0.01, 0.01), #positions)
    local colors1 = fastlist.fromValue(Vec.V2(1, 0), #positions)
    local colors2 = fastlist.fromValue(Vec.V2(0, 1), #positions)
    local together = positions:weave({ sizes, colors1, colors2 })
    Debug.fprint(#positions)
    together:drawRects()
end)
While fastlist are fast, they are less readable, so first write your code in a readable way and turn it to a fastlist later.
A fastlist has the same functions as a Vec (+, -, scale, max, dot, etc…), so you can just change your types in the function signature and it will work.
Moreover, fastlists have special functions to handle conditions, like filterBetweenX. Check luau-api to see all the available functions and “the optimizing your game” guide.
Using shaders
Section titled “Using shaders”Call at graphics.drawRect at most 20 000 times per frame for 60 fps on all platforms.
I don’t really know why you’d want to draw that many rectangles.
If you want to draw something on every pixel, use a canvas with a shader instead of called graphics.drawRect on a per-pixel basis!
See the shader section above for more information on writing shaders.
Reducing draw calls and using sprites
Section titled “Reducing draw calls and using sprites”A draw call is a command to the GPU to draw something. Every draw call has an overhead, so the less draw calls you perform, the faster your game will run. Vectarine automatically groups your drawing instructions to reduce the number of draw calls.
-- This is one draw call
Graphics.drawRect(V2(0, 0), V2(1, 1), Vec4.RED)
Graphics.drawRect(V2(1, 1), V2(1, 1), Vec4.GREEN)
As long as the “kind” of drawing you do is the same, Vectarine will be able to group the rendering instructions together and reduce the total number of draw calls. To help Vectarine do this grouping, you should try to group similar drawing function together.
When you draw 2 different images, this counts as 2 different “kinds” of drawing, and 2 draw calls will be performed.
To have only one draw call, you should use one image and draw portions of it using the image:drawPart function.
You can see the total number of draw calls performed in the profiler. Try to keep it below 1000 per frame.
📦 Release and distribute your game
Section titled “📦 Release and distribute your game”Using the ‘Export’ menu
Section titled “Using the ‘Export’ menu”Go to File > Export..., choose a platform to export to and Press Export.
The exported zip will be created in the folder of your project. You can press the Open Folder button to open it.
You can distribute the zip as is.
Obfuscation
Section titled “Obfuscation”Obfuscation is an optional optimization process that you can toggle when exporting. Obfuscated games run faster and have smaller bundle sizes. The content of a bundled game is not readable without the use of specialized reverse engineering tools.
The obfuscation process is similar to a regular exports, but instead of putting all your assets into a gamedata folder, Vectarine puts them inside a bundle.vecta zip file with a compression algorithm.
Moreover, your scripts are compiled to bytecode to make them smaller and run faster.
❓ How does Export work and how are exported games structured?
Under the hood
Section titled “Under the hood”Vectarine first looks at the files in your project folder. It puts all the ones that your game uses (like game.vecta, your scripts, your textures, etc…) into a ‘gamedata’ folder.
On Desktop
Vectarine takes the ‘gamedata’ folder and zips it with the runtime file corresponding to the export platform. So runtime.exe on Windows, runtime-macos on Mac, etc…
On the Web
Vectarine puts together index.html, runtime.js, runtime.wasm and the gamedata folder in a zip.
You can serve these files with any static file server, for example by doing python -m http.server and going to http://localhost:8000.
If you see: “Error loading runtime”, it means that you opened index.html directly from the filesystem instead of starting a server.
It can also mean that you forgot to put runtime.js and runtime.wasm in the same folder as index.html.
You put these files in a zip and upload it to itch.io if you want.
🧩 Extending Vectarine with Plugins
Section titled “🧩 Extending Vectarine with Plugins”Plugins are a way to add features to the vectarine editor and to your game. Plugins can add new interfaces in the editor, new luau functions, and do basically anything. Because of this, using a plugin in a game requires that you trust the author.
Plugins exist in the form of files with the .vectaplugin extension. Vectarine stores a list of trusted plugins that you can use in your games to a plugins folder.
You can open it using the “Open plugins folder” button in the “Plugin manager”. When you download a plugin, add it to this folder and refresh the list for it to appear.
Games have their own list of plugins in their plugins folder which should be next to the game.vecta file. For security reasons,
the vectarine editor will only load plugins from a game if they are also in the plugins folder of the editor and are thus trusted plugins!
If you want to make your own plugins, check the README of the vectarine plugin template on Github.
When you export a game to a specific platform, the parts of the plugin needed for that platform are obtained from the .vectabundle and are stored inside the output file.
👥 Collaborating on a project
Section titled “👥 Collaborating on a project”Working on a game with other people is more fun!
Vectarine and Git
Section titled “Vectarine and Git”Vectarine works well with version control systems like Git. If you already now Git, use it! You can add “luau-api” to your .gitignore as it is automatically generated by Vectarine when the project is loaded.
If you don’t know Git, do not use it, it is complex to learn.
Vectarine and shared folders
Section titled “Vectarine and shared folders”You use shared folder using Google Drive, Dropbox to have multiple people working on the same project.
You just need to share the folder with the game.vecta file.